

Recycled plastic bag
Yeni picked this one. I think it needs a clasp of some sort. What do you think?
Now I have to figure out how to get it to the USA. ;-)
Pick your prize
We have a winner!
Guess what this is?

 Yesterday − all day − Arexy and I made tamales with the leftover pork. That was another first. It was a bit of the case of the blind leading the blind since Arexy had only made them once years ago, but we muddled through it and they turned out pretty well in the end. The photo shows some of the 36 tamales that we made.
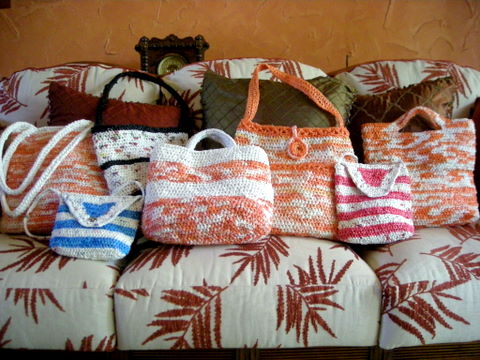
 Since I can never just sit and watch television, movie watching came with a lot of crocheting. I was working on using up some of my plastic bag stash. These are some of my latest recycled plastic bag bags. Pretty cool, huh?
 Pretty in pink bag
 These photos are of two of my favorite crocheted plastic bag bags. I was trying to arrange a photo a little more artistically than I usually do (by plopping it down in a chair and snapping a photo). In my mucus-induced brain fog, I couldn't decide which photos I liked best, so here are all of them.
 The pink bag supply came all the way from Indiana, USA! Aighmeigh sent them to me. Thank you, Aighmeigh! I'd love to get more of these pale pink bags but since they were a special bag for breast cancer awareness month in October, they probably aren't still available. The purple and hot pink writing on the bag made for nice purple and pink flecks when crocheted.
 Honestly, this bag turned out so nicely that I would use it for a purse! I had to make it small because there were only 32 pink bags and the mostly bright colors that I have made the pale pink looked washed out.
 Sherbet stripes
 The striped bag was an effort to use a bunch of very small, very thin, different colored striped bags. I winged it and ripped out and restarted this project so many times. I wasn't entirely happy with the way the bottom row turned out. I crocheted the sides of the bag horizontally and connecting them to the base as I went along was difficult to do neatly.
 Since I've been sick for almost 3 weeks :-{ , I've been doing lots of crocheting and have several more bags to show you soon, including the 'manly man' bag I made for my contest winner, Don Ray in Panama.


 La Gringa's tropical-sized rain gauge
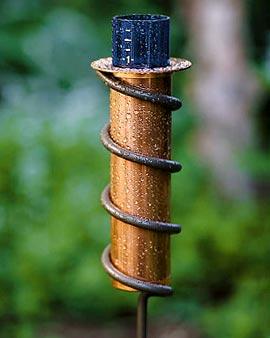 I searched the internet for ages looking for a tropical-sized rain gauge with no luck. Some gauges are very large but still only measure 5-6 inches (13-15 cm.) of rain. I fell in love with this copper design in August 2006 but it was too small. When you are in the midst of a tropical storm, you don't exactly feel like going out in the rain to empty the gauge two or three times a day.
 We finally found someone willing to do it. Of course, he completely ignored our drawing and measurements but it turned out nice just the same. The base is about 5 feet (1.5 meters) so that it goes into the ground very deeply and is secure even when the ground is saturated.
 La Gringa's Recycled Plastic Market Bag
 Experiment with a swatch so you'll have an idea of how your particular bags and choices will vary in size and thickness. The pattern is easy to adjust even for a beginner, since it is based on inches rather than number of stitches.
 *Ch 1, turn, sc in each stitch across. Repeat from *, until the bottom base of the bag is 3-4 inches wide (8-10 cm.), or the depth that you want. You'll be crocheting with the right side facing you at all times.
 Subsequent rounds: Sc in each sc around. Repeat until the sides measure about 11 inches tall (28 cm.), or about an inch (2.5 cm.) less than the final height that you want. End at the middle of one of the short sides.
 Form handle: Sc in each sc and each chain around.
  Originally, I tried some other edging stitches but none looked right. They all seemed too heavy and bulky for the plastic that I was using. The reverse single crochet in a thinner plarn seemed to cover the edge best on this bag, though I did have to do two stitches in a few spots to get good coverage.
 You can also decorate the bag with something cute or kitschy, like a crocheted flower, star, snowflake, silk flowers, decorative buttons, or whatever strikes your fancy. Use a large blunt needle with upholstery thread or fishing line to attach it to the bag.

 So how do you get from this (your stash of plastic bags) to the plarn shown above? Gather up your bags, a pair of scissors, and a ruler or yardstick. Here are step-by-step instructions to cut plarn in three different ways. Click on any of the photos to show them larger in your browser window.
 Lay down one bag, smooth out the wrinkles and squeeze out the air by running your hand over it from the bottom seam to the top. Fold neatly into thirds.
 Lay the folded bag against a yardstick and with scissors make snips to mark your desired cutting lines, for example, every inch or two inches (2.5 or 5 cm.). Even quicker is to snip only every other cut. Pick up the folded bag and hold it carefully to finish cutting the strips apart, eyeballing where to make the center cut if you only marked every other cut. The plastic will slide around a little but don't worry if your strips are not all the exact size.
 You'll end up with a pile of loops like this. If your plastic bags vary slightly in color or opacity, connect them together randomly so that the difference won't be noticeable. If they are significantly different, you could ball them separately for a striped project.
 Place the end of loop #1 on top of loop #2. In this photo, I'm calling loop #1 (white and blue) the long piece and loop #2 (yellow) the short or new piece. If you've already joined several pieces or have starting making your ball, this will be loop #1 and it will be your stationary side.
 Pull the end of loop #2 up and over loop #1 back toward itself.
 Feed the other end of loop #2 through the loop you've just made. Now you see why the "long" piece is stationary. It is much quicker to pull one length through to make the knot than to have to pull a long length of plastic.
  Pull gently and evenly to make the knot. Tip: I found that by keeping my thumb in the loop as I pulled helped to make a neater knot. Pull out your thumb just before you finish the knot.
 Leave the knot slightly loose as it may need adjustment later as you crochet. Tighten it just before you crochet that section. It may be hard to believe, but the knots are really not noticeable in the end product.
  Start preparing the bag in the same manner as above (smoothing and folding) but leave about an inch (2.5 cm.) unfolded at the top. Mark and make your cuts but do not cut into the one-inch area at the top of the folded bag.
 Make an angled cut from the left cut edge of loop #1 at the bottom of your hand to the right edge of loop #1 at the top of your hand.
 Prepare and cut the plastic as in method #1 above, cutting to the desired width and the longest lengths that you can. Fold over about a half-inch (1.25 cm) of the end of one strip and make a short snip in the center of the fold, being careful not to cut through to the end of the plastic. Do this at each end of each piece.
 Fold one end of the short strip in half lengthwise and poke it through the snipped hole on the long strip (step #1 in the photo) − like you are threading a needle. Pull it through a couple of inches and then fold the other end of the short strip lengthwise and thread it through the hole at the opposite end of the same strip (step #2 in the photo). Pull the short strip completely through the eye. Carefully push the "knot" down and tighten it only enough so that it won't be bulky (step #3).
 Here is a closeup in case you are having trouble following my instructions. The long strip is on the left and the short is on the right.
 The Torture bag,
  This plastic is heavy and even though I cut it half the width (1" [2.5 cm.]) of the flimsier bags, it was still too thick. Since I had already cut all the plastic in advance (not following my tip below), I was stuck completing the bag with this same size plarn. Thankfully, El Jefe gave me some fabulous hand and finger massages to try to ease the pain.
  Stick to one thickness of plastic if you can. The size and thickness of the stitch will vary with the weight of the plastic, even if the strips are cut to the same size. You might be able to adjust for a heavier plastic by cutting it slightly narrower. Or try mixing the two weights of plastic together randomly as mentioned above.
 When preparing to cut, lay the bag flat, smooth it from the bottom seam up to squeeze out the air, and fold it neatly. This is just to make your cutting easier and more accurate. Any wrinkles in the bag will not be noticeable in the finished project.
  There are three basic ways to cut and join the plarn (plastic yarn). They each have their advantages and all can be tedious. (Cuesta!) I have so many step by step photos of the plarn preparation that I will include them in a separate article tomorrow.
 The measurements of the strips don't have to be exact. I put a ruler, or even better, a yardstick, on top of the folded bag and snipped a short cut to mark the spots. I then picked up the folded bag to cut the folded strips apart. When cutting 1" pieces, I made a snip every two inches and eyeballed the middle of the snips for the 1" cut. I did the same thing for 1/2" pieces.
 To save storage space and organize your stash, lay 10 similar colored bags together and smooth them out into a neat stack. Fold the stack lengthwise in thirds, snip off the handles, if any, and smooth them again from the bottom up to squeeze out the air. Fold in half and stack the various colored bundles vertically in a shopping bag. You'll be amazed at how much less space they take up. It also saves a lot of time when looking for a certain color or "taking inventory" of how much of each color you have.
 Keep in mind that the color will be intensified when the plastic is scrunched up in the stitches. You can see the effect in this photo by comparing the color of the bag with the color of the crocheted project.
 The whopper
 The Honduran special
 Remember that I started with these?
 For the orange bag, I used these familiar striped bags.

 Welcome to my Blogicito — spanglish for 'little blog'. I am a US expatriate who has been living here in La Ceiba, Honduras, with my Catracho husband since 2001 and blogging about Honduras and my expatriate life since 2006.

 |
 Click the yellow note to subscribe.
Don't forget to confirm when you receive the email! Your subscription won't start until you do.
Click the yellow note to subscribe.
Don't forget to confirm when you receive the email! Your subscription won't start until you do.
 |
 |
 |
 |


