Did I overwhelm you with tips and instructions? I hope not! Recycling your plastic bags by crocheting a market bag is not complicated at all. This pattern uses only the single crochet and chain stitches and one slip stitch. Can't get much easier than that, can it?
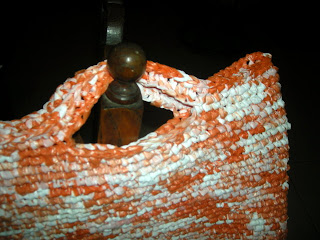
Here is a basic pattern which you can make your own by varying the colors, size, and thickness of your plarn (plastic yarn). I used the familiar heavyweight orange and white striped Honduran grocery bags cut in 1 inch loops using the square-knot method. BUT, that is not what I want you to do since I wouldn't wish the torture bag on anyone. Please do read the tips linked below before you start. I want you to have a good experience.
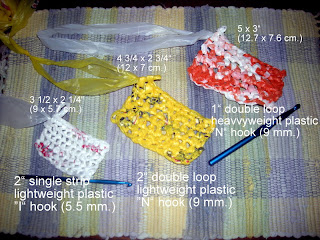
The flimsy, handled grocery bags are much easier to crochet. If you are going to use these bags, I suggest using using 1-2" loops with the square knot method, or 1 1/2 to 2" strips using the single strip methods #2 or #3. An N hook (9 mm.) works well with the square knot double loops. A smaller hook, maybe H or I, will work better with the single strips. A very rough estimate is that you will need 50-60 handled grocery bags.
If you are going to use a heavyweight bag like a department store bag, cut your loops only 1/2" wide for the square knot method or 1/2 to 1" for the other two single strip methods. This market bag used 25 18x24" bags (46x61 cm.), but by using thinner strips, you may need only 15-20 heavyweight bags.
 Experiment with a swatch so you'll have an idea of how your particular bags and choices will vary in size and thickness. The pattern is easy to adjust even for a beginner, since it is based on inches rather than number of stitches.
The swatches in this photo will give you an idea of the effect of different bags and different size plarn and hooks. Click to enlarge any of the photos in your browser.
La Gringa's Basic Market Bag pattern
Make square bottom base: Chain loosely 30 times (approximately 14 inches). This is where you'll adjust to the width of your bag. Add or reduce chains to get the width of the bag that you want −12-16" is good (30-40 cm.)
 *Ch 1, turn, sc in each stitch across. Repeat from *, until the bottom base of the bag is 3-4 inches wide (8-10 cm.), or the depth that you want. You'll be crocheting with the right side facing you at all times.
First round of bag sides: Crochet 1 more sc in the corner stitch, sc in each stitch across the short end, *2 sc in the corner stitch, sc in each stitch across. Repeat from * until you have reached the beginning of the first round. No need to slip stitch into the previous row.
 Subsequent rounds: Sc in each sc around. Repeat until the sides measure about 11 inches tall (28 cm.), or about an inch (2.5 cm.) less than the final height that you want. End at the middle of one of the short sides.
Planning the handles: Lay the bag flat and count the number of stitches showing on one side of the top row. Divide that number by 3 to determine how many stitches in one-third of the top edge (12 stitches in my case).
Make handle opening: Sc in each stitch across the first one-third, loosely chain 15 skipping the next one-third of the stitches. You'll want the chain to be an inch or two (2.5-5 cm.) longer than the area that you skip. Adjust the length of your chain so that the size of the handle opening is pleasing to you. Sc in each sc in the final third on that side and first third on the other side. Ch 15 (or the number that you have selected), skipping the next third of top of bag, sc in each sc to beginning of round.
 Form handle: Sc in each sc and each chain around.
 Final 2-3 rounds: Sc in each sc around until the handle is the thickness that you want. On final round, join to beginning sc with a slip stitch. Pull the end through the loop to finish off. On the inside of the bag, neatly weave in 2-3 inches of the plarn tail using a smaller hook. Cut excess.
You are done! Or maybe not....
To edge or not to edge
You can quit here, or if desired, make an edging around the top edge and the handle opening using a complimentary or contrasting color. I found that the top edge gaped open a little more than I liked. To "tighten it up" and to give the bag a more finished look by eliminating the chains showing around the top edge, I used a smaller hook (H in this case) and a single 1" wide piece of plarn cut from only the orange stripes of my bag to crochet a reverse single crochet stitch all around the edges.
 Originally, I tried some other edging stitches but none looked right. They all seemed too heavy and bulky for the plastic that I was using. The reverse single crochet in a thinner plarn seemed to cover the edge best on this bag, though I did have to do two stitches in a few spots to get good coverage.
Reverse single crochet is also sometimes called rope edging, crab stitch, or backwards single crochet. It is made by doing a normal single crochet stitch from the front side of your work, but doing it from left to right. It can be a little tricky and if you don't hold your hook right, you'll end up with another row of chains showing at top. Here are two good videos which demonstrate the stitch and show how it should look when completed. Note how loose they hold the loops on the hook.
Reverse single crochet
Crab stitch edging
 You can also decorate the bag with something cute or kitschy, like a crocheted flower, star, snowflake, silk flowers, decorative buttons, or whatever strikes your fancy. Use a large blunt needle with upholstery thread or fishing line to attach it to the bag.
Enjoy! And if you have any questions, leave a comment and I'll try to answer right away. I'd love to see your finished bags so if you can send me a photo, that would be great.
By special request, in a later article, I'll post the basic instructions in Spanish, too.
Related articles:
3 methods of making plastic yarn
Tips for avoiding the plastic torture bag
Need more plastic bags! Must have plastic bags!
Sneak preview: The plastic bag bag


 Welcome to my Blogicito —


