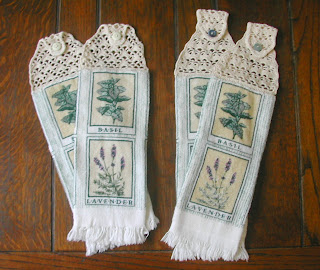
During our latest movie marathon (where we were catching up on movies we've missed from 2005 and 2006!), I started these kitchen hand towels. I can't just sit and watch television. I like to be doing something useful so I crochet while I'm watching.
 I've made several of these towels for myself and for gifts in the past, but the ones that I brought with me are getting pretty shabby looking. Also, they were made from heavier towels, which don't work so well here in permanent high humidity − they never seem to dry out.
For these, I used a #10 cotton crochet thread. In the past, I've used a "rug" weight cotton thread. I don't think yarn would hold up to the constant washing without becoming all fuzzy looking. I haven't tried an acrylic thread, but that might work best of all since it would dry faster and might hold up better to repeated washings.
Materials needed for 2 towels:
1 kitchen towel
fine crochet hook, size 9-10
larger crochet hook, size 6-7
#10 crochet thread
2 buttons
The first step is to cut the kitchen towel in half. Each towel will make two hand towels. Fold the sides of the towel in neatly, or in thirds depending upon the finished size that you want. These towels in the photos are folded into thirds because that is what worked best with the design on the towel.
With a fine crochet hook, insert it through all layers of the towel fabric at the cut end, an 1/8 to 1/4 inch (3-6 mm.) beneath the cut edge. Pull up a loop and make a single crochet (punto bajo in Spanish) enclosing the cut edge. Continue making loose single crochet stitches evenly spaced across the folded towel, being sure to catch in all layers and enough of the fabric so that it won't unravel.
Getting the hook and thread through the towel is the hardest part. These towels are really flimsy − I hope that they don't unravel!
Note: If you are going to use a thicker thread, you will still need to make this first row with #10 or finer thread. Trying to get a thicker thread or yarn to pull through the fabric will be very difficult and may result in the cut end of the towel unraveling. After this first row, finish off the cut end of the finer thread and begin the next row with the thicker thread and the larger hook.
For the second row, switch to a larger hook. I usually do a row of single or double crochet (puntos altos) stitches, increasing or decreasing the number of stitches so that I have the number required for my pattern.
At this point, you can work any attractive crochet pattern for 2 to 3 inches (5-8 cm.). A shell stitch, pineapple stitch, or any open pattern looks nice or you can just do a plain stitch.
After the first 2 to 3 inches, continue working your selected pattern but decrease evenly on both sides to shape it to a tab about 1 1/2 inches wide (4 cm.).
Continue working the pattern until your tab is 2 to 4 inches long (5-10 cm.). Near the end of the tab, make sure that your pattern includes a space large enough for the button to go through. If your pattern doesn't have an opening large enough, you'll have to form a buttonhole near the end.
When the tab is as long as you want it, finish off the end of the thread. Starting at the right side, with the right side of the towel facing you, crochet an edging all the way around the crocheted part and finish off the thread. A simple single or double crochet edging will work, or you can do something fancier.
 Shoot for your crochet work to measure somewhere around 5 to 8 inches long (12-20 cm.).
 The measurements can vary and will depend upon your selected pattern and the handle you are going to hang it from. For example, if you are going to hang it from a refrigerator handle, your tab may need to be longer to fit around the handle than if you will hang it from a narrow cabinet handle or towel bar.
Drape the tab over the handle and note where the button should go. Sew the button on the right side of the crochet work so that the tab folds over in front.
You are done. Enjoy!


 Welcome to my Blogicito —


